Investigating the Refraction of Light (Oxford AQA IGCSE Physics)
Revision Note

Author
Ann HowellExpertise
Physics Content Creator
Investigating the Refraction of Light
Aim of the experiment
To investigate the refraction of light through glass and perspex blocks
Variables
Independent variable = material of the block
Dependent variable = angle of refraction
Control variables:
Width of the light beam
Same frequency / wavelength of the light
Equipment
Equipment List
Equipment | Purpose |
|---|---|
Ray box | To provide a narrow beam of light to reflect in the mirror |
Protractor | To measure the angle of the light beams |
Sheet of paper | To mark the light rays |
Pencil | To mark the paper |
Ruler | To draw lines on the paper |
Perspex block | To refract the light |
Glass block | To refract the light |
Resolution of measuring equipment:
Protractor = 1°
Ruler = 1 mm
Method
Equipment for investigating the refraction of a glass or Perspex block
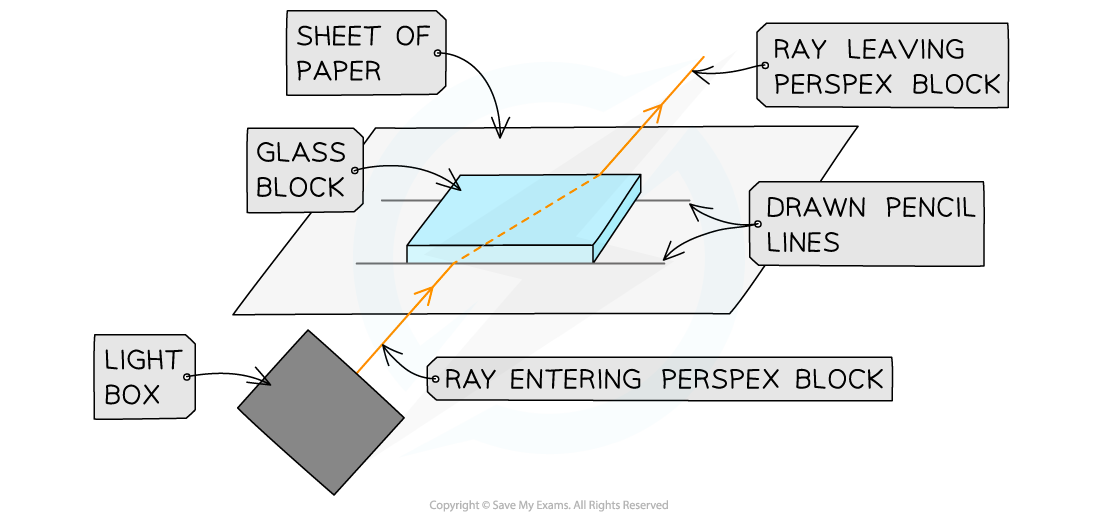
Place the Perspex or glass block on a sheet of paper, and carefully draw around it using a pencil
Switch on the ray box and direct a beam of light at the side face of the block
Mark the following on the paper:
A point on the ray close to the ray box
The point where the ray enters the block
The point where the ray exits the block
A point on the exit light ray which is a distance of about 5 cm away from the block
Remove the block and join the points marked with three straight lines
Draw the normal as a dashed line at a right angle to the edge of the block from the point at which the ray enters the block
Replace the block within its outline and repeat the above process for a ray entering the block at the normal for different angles of incidence
Repeat the procedure for the other material
Example Results Table
Material of block | angle of incidence, (i) / ° | angle of refraction, (r) / ° | sin(i) | sin(r) |
Perspex | 10 | |||
Perspex | 20 | |||
Perspex | 30 | |||
Perspex | 40 | |||
Perspex | 50 | |||
Perspex | 60 | |||
Perspex | 70 | |||
Glass | 10 | |||
Glass | 20 | |||
Glass | 30 | |||
Glass | 40 | |||
Glass | 50 | |||
Glass | 60 | |||
Glass | 70 |
Analysis of results
Plot a graph of sine of angle of incidence, sin(i) against sine of angle of reflection sin(r) for both the glass and Perspex blocks
The graphs for both materials should follow the same straight line with a positive gradient
The graph for the glass block should have a steeper gradient than the Perspex block because it has a higher refractive index
The gradient of the graph is equal to the refractive index of the material, n because:
![]()
Angle of incidence-angle of refraction graphs for glass and Perspex

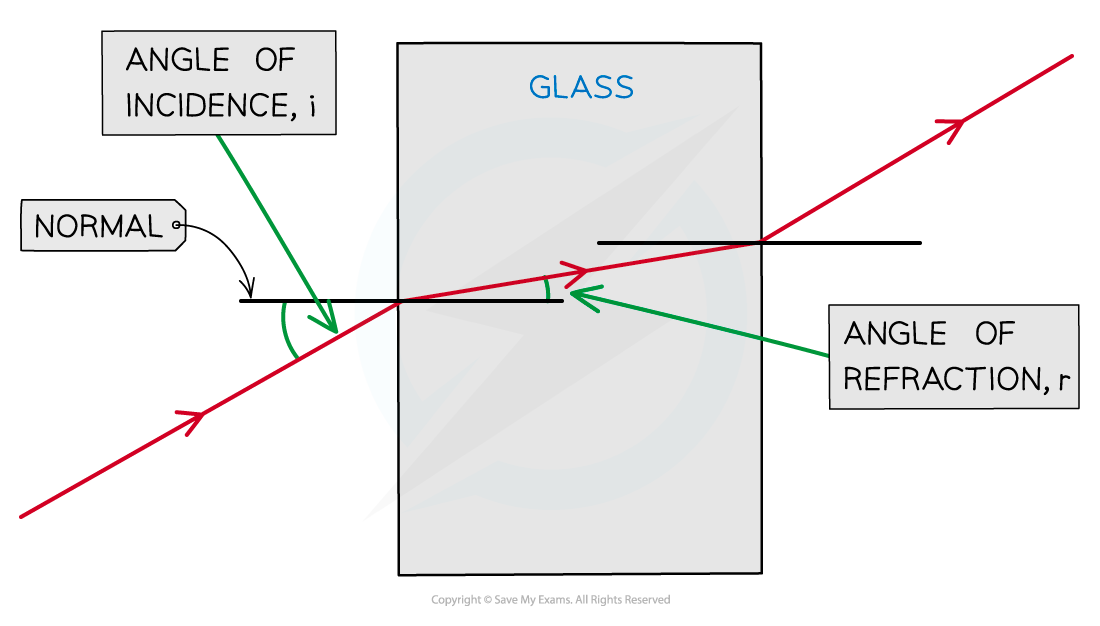
For light rays entering the Perspex or glass block, the light ray refracts towards the normal:
i > r
For light rays exiting the block:
The light ray incident on the block-to-air boundary is the same as the ray refracted from the air-to-block boundary
The light ray refracts away from the normal:
i < r
So this angle of refraction is equal to the angle of incidence of the light ray in the air
When the angle of incidence is 90° to the block, the light ray does not refract, it passes straight through the block:
i = r
If the experiment was carried out correctly, the angles should follow the pattern, as shown below:
Measuring angles for block
Evaluating the experiment
Systematic errors:
An error could occur if the 90° lines are drawn incorrectly
Use a set square to draw perpendicular lines
Make sure the room is blacked out so it is clear to see the correct ray lines
Random errors:
The points for the incident ray and reflected ray may be inaccurately marked
Use a sharpened pencil and mark in the middle of the beam
The protractor resolution may make it difficult to read the angles accurately
Use a protractor with a higher resolution
Safety considerations
The ray box light could cause burns if touched
Run burns under cold running water for at least five minutes
Looking directly into the light may damage the eyes
Avoid looking directly at the light
Stand behind the ray box during the experiment
Keep all liquids away from the electrical equipment and paper

You've read 0 of your 0 free revision notes
Get unlimited access
to absolutely everything:
- Downloadable PDFs
- Unlimited Revision Notes
- Topic Questions
- Past Papers
- Model Answers
- Videos (Maths and Science)
Did this page help you?